
Table of Contents
- Why Dust Control Matters During Kitchen Remodeling
- Seal Off Work Zones with Plastic Sheeting and Containment Barriers
- How to Protect HVAC During Construction
- Best Air Scrubbers for Home Renovation
- Daily Cleaning and Dust Extraction During the Project
- Cleaning Construction Dust After Renovation
- Personal Protective Equipment and Safety
- Conclusion
Last Updated: August 30, 2026
Why Dust Control Matters During Kitchen Remodeling
Kitchen remodeling creates significant dust that spreads far beyond the work zone. Drywall sanding, demolition, and material cutting release fine particles into the air that settle on furniture, electronics, and throughout your home. Without proper dust control, you’re looking at weeks of cleanup after the project ends, potential health risks from silica dust and other airborne particles, and damage to your HVAC system that can cost thousands to repair.
The dust problem gets worse the longer your remodel runs. A two-week project generates manageable debris. A three-month kitchen overhaul without containment can leave your entire house coated in a fine layer of construction dust that infiltrates every room, every closet, and every surface. The difference between projects with dust control and those without is stark. Homes with proper containment stay livable during construction. Homes without it become uninhabitable work zones.
The good news: minimizing dust during kitchen remodel is straightforward when you understand the fundamentals. The approach combines three core strategies: physical containment to keep dust in the work zone, active air filtration to capture particles before they spread, and daily cleaning to prevent accumulation. This guide walks you through each strategy with specific tactics you can implement immediately.
Seal Off Work Zones with Plastic Sheeting and Containment Barriers
The first line of defense against dust migration is physical containment. Plastic sheeting and specialized containment barriers create an isolated work zone that prevents dust from traveling into living spaces. This is non-negotiable for any kitchen remodel lasting more than a few days.
Creating an Effective Containment Zone
Start by identifying all openings that connect your kitchen to the rest of your home. Doorways are obvious, but also consider return air vents, light fixtures, and gaps around pipes or electrical conduits. Every opening becomes a pathway for dust unless sealed.
Use heavy-duty plastic sheeting (at least 6 mil thickness) to create your containment barrier. Thinner plastic tears easily under construction activity and fails to contain dust effectively. Seal all seams with duct tape or specialized containment tape rated for construction use. The goal is an airtight barrier that forces dust to stay within the work zone.
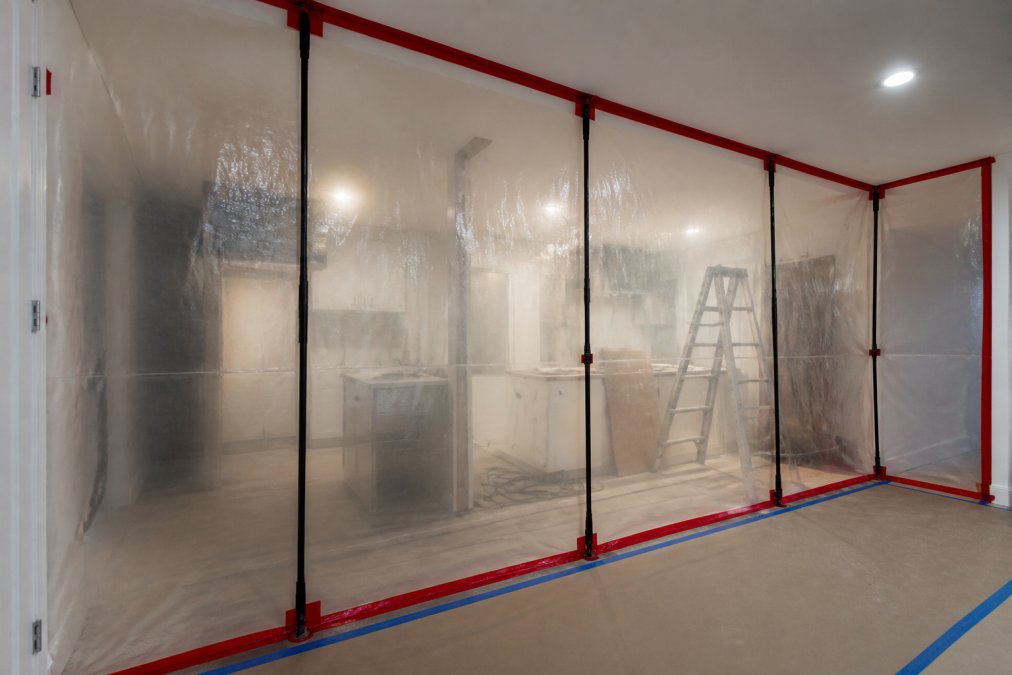
Zip walls offer a faster, more professional approach to containment. These are temporary wall systems that use plastic sheeting suspended on metal frames with zipper openings. They seal tightly against walls, ceilings, and doorways without requiring extensive taping. The zipper allows workers to move in and out without breaking the seal. For kitchen remodels where you need frequent access, zip walls save time and provide superior containment compared to plastic sheeting alone.
Position your containment barrier at least one room away from the actual work area if possible. This creates a buffer zone that catches dust before it reaches your living spaces. If your kitchen is open-concept, you may need to extend containment further into adjacent areas.
Sealing Doorways and Entryways
Doorways are the biggest vulnerability in any containment system. They’re high-traffic zones where workers move equipment in and out constantly, and every opening releases contained dust. Seal doorways with plastic sheeting, then create a zippered access point or overlap the plastic so workers can push through without breaking the seal.
For doors that need regular use, consider a temporary plastic wall with a zipper entrance. This allows controlled access while maintaining the barrier. Make sure the zipper is positioned away from the primary work area so dust doesn’t escape when the door opens.
Tape all edges of plastic sheeting to walls, ceilings, and floors using painter’s tape or duct tape. Pay special attention to the top corners where plastic often peels away. Loose edges allow dust to escape around the barrier, defeating the entire containment system.
If your kitchen has return air vents that pull air back into your HVAC system, seal these vents completely during demolition and heavy dust-generating work. Unsealed vents pull dust directly into your air ducts, contaminating your entire home’s air supply and potentially damaging your HVAC system.
How to Protect HVAC During Construction
Your HVAC system is vulnerable during remodeling because it’s designed to pull air from throughout your home. If that air contains construction dust, your system circulates it everywhere and accumulates it in your ductwork and filters. Protecting your HVAC prevents expensive cleaning or replacement later.
Start by sealing all return air vents in and around your kitchen. Use plastic sheeting and tape to completely block air from flowing back into your return ducts during heavy dust-generating work. This forces dust to stay in the containment zone instead of being pulled through your system.
Consider having your HVAC system professionally inspected after heavy demolition work. Dust accumulation in ducts can reduce airflow efficiency and increase energy costs. A professional cleaning removes settled particles that regular filter changes won’t capture.
Upgrade your furnace filter to a HEPA-rated filter before the project starts. HEPA filters capture 99.97% of particles 0.3 microns and larger, significantly improving your system’s ability to handle construction dust (the EPA). Replace the filter more frequently during the remodel, potentially every 1-2 weeks instead of the standard 3 months, since dust load will be much higher.
If your kitchen remodel involves extensive demolition, consider temporarily shutting down your HVAC system during the dustiest work phases. This prevents dust from being drawn into your ducts while the containment zone is being set up or when barriers are breached for equipment movement. Run your system only during periods when dust generation is minimal or when your air filtration equipment is actively running.
Best Air Scrubbers for Home Renovation
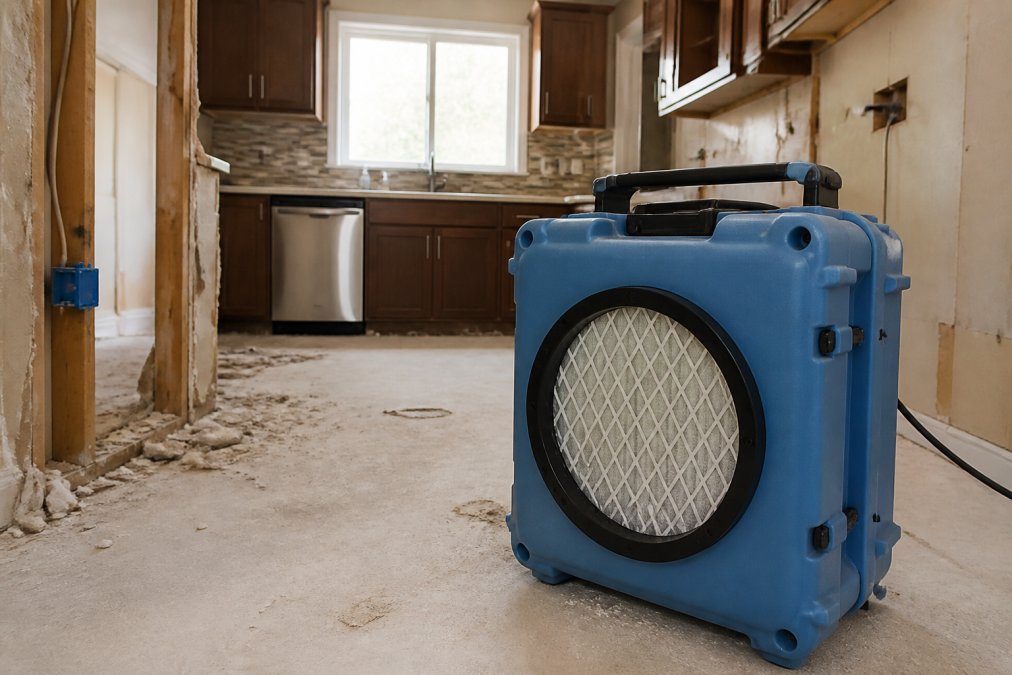
An air scrubber is a portable unit that pulls air through a HEPA filter, capturing fine dust particles before they settle on surfaces or enter your HVAC system. For kitchens where minimizing dust during kitchen remodel is critical, a quality air scrubber becomes essential equipment rather than optional.
HEPA Filtration and Negative Air Pressure
HEPA filtration removes fine particles that regular filters miss. A true HEPA filter (not "HEPA-type") captures 99.97% of particles as small as 0.3 microns (the FDA). This matters because silica dust from cutting drywall or concrete creates particles in this size range. Without HEPA filtration, these particles remain airborne and pose respiratory risks.
Position your air scrubber in the center of your containment zone, elevated slightly off the floor so it can pull air from the breathing zone. The unit should run continuously during and for several hours after dust-generating work. A single air scrubber handles most residential kitchen work, but larger remodels benefit from two units running simultaneously.
Negative air pressure is the concept of pulling more air out of a space than you’re bringing in, which forces air to flow from clean areas into the containment zone rather than the reverse. This prevents dust from escaping. Your air scrubber creates negative pressure within your containment zone when it’s the only significant air movement happening.
Check your air scrubber’s filter regularly during the project. A clogged filter reduces effectiveness and increases noise. Some units have filter indicators that show when replacement is needed. Plan to change filters more frequently during heavy demolition work, potentially every few days instead of weekly.
Daily Cleaning and Dust Extraction During the Project
Dust accumulation compounds over time. Daily cleaning prevents particles from settling and becoming harder to remove. It also maintains better air quality for workers and reduces the amount of dust that escapes your containment zone.
Use a HEPA-rated shop vacuum for all dust cleanup during the project. Regular household vacuums lack the filtration to capture fine construction dust, they actually release particles back into the air through their exhaust. A HEPA shop vac captures dust without spreading it further.
Damp-wipe surfaces daily using microfiber cloths slightly dampened with water. Microfiber attracts and holds dust particles better than cotton cloths, and the moisture prevents dust from becoming airborne when you wipe. Focus on high-traffic areas, work surfaces, and any surfaces that will be visible to living areas outside the containment zone.
Sweep the containment zone at the end of each workday, then damp-mop to capture dust the broom misses. This prevents dust from accumulating and being stirred up by foot traffic the next morning. The damp-mopping step is essential, dry sweeping releases dust back into the air.
Keep your air scrubber running for at least two hours after work ends each day. This gives the equipment time to capture particles that were stirred up during cleanup and that would otherwise settle overnight.
Cleaning Construction Dust After Renovation
Once your kitchen remodel is complete, the containment barriers come down and the real cleanup begins. Post-remodel dust extends beyond the kitchen into adjacent rooms and throughout your home if containment wasn’t perfect. A systematic approach prevents you from pushing dust around and ensures thorough removal.
Post-Remodel Deep Cleaning Protocol
Start by vacuuming all surfaces in the kitchen and containment zone using your HEPA shop vac. Furniture, shelving, countertops, and the floor all need attention. Work from top to bottom so dust from higher surfaces falls onto lower areas you haven’t cleaned yet. This prevents re-contaminating areas you’ve already cleaned.
Move to adjacent rooms and repeat the vacuuming process. Dust travels further than most homeowners expect, so plan to vacuum living rooms, bedrooms, and hallways adjacent to your kitchen. Check closets and interior spaces that may have accumulated fine dust.
After vacuuming, damp-wipe all surfaces using microfiber cloths and water. Start with high surfaces like ceiling fans, light fixtures, and shelving. Work your way down to countertops, furniture, and baseboards. The damp-wiping captures dust the vacuum missed and prevents it from becoming airborne again.
Clean your HVAC system after the remodel. Have a professional inspect and clean your ducts if the remodel was extensive. At minimum, replace your furnace filter and run your system with a fresh HEPA filter for several days to capture any remaining dust in your air supply.
Dealing with Fine Drywall and Silica Dust
Drywall dust and silica dust require special attention because these particles are extremely fine and pose respiratory risks. Silica dust specifically is classified as a known carcinogen when inhaled over time, making it critical to remove completely rather than just pushing it around (the CDC).
Use only HEPA-rated equipment for cleaning drywall and silica dust. Regular vacuums and air filters won’t capture these fine particles effectively. Your HEPA shop vac and HEPA air scrubber are essential tools for this work.
After vacuuming, damp-wipe all surfaces thoroughly. The moisture prevents fine particles from becoming airborne. Pay special attention to horizontal surfaces like shelves and ceiling fans where silica dust settles. These areas hold particles that can be stirred up by air movement or cleaning activity if not properly wetted down first.
Consider having your home’s air professionally tested after the remodel if you’re concerned about silica dust exposure. Some professional remediation companies offer air quality testing that measures particulate levels and confirms that cleanup was effective.
Personal Protective Equipment and Safety
Workers and anyone in the home during the remodel need proper protection from construction dust. Personal protective equipment isn’t optional, it’s essential for health and safety.
Respirator masks rated for construction dust should be worn by anyone working in the containment zone or doing cleanup. A simple dust mask isn’t sufficient for fine particles like silica dust. Look for masks rated N95 or higher for general construction dust, or P100 masks if silica dust is involved. The mask must fit properly to be effective, gaps around the edges allow unfiltered air to bypass the filter.
Eye protection prevents dust from irritating eyes during work and cleanup. Safety glasses or goggles with side protection work well for this purpose.
Gloves protect your hands and prevent dust from being transferred to other areas of your home when you touch surfaces. Disposable gloves work fine for cleanup, but reusable gloves are more economical for longer projects.
Long sleeves and pants reduce skin exposure to dust and irritation. Construction dust can irritate exposed skin, and wearing protective clothing prevents this discomfort.
At N. Abeyta Remodels, we ensure all workers follow strict PPE protocols during every project. Proper equipment protects your health and your family’s health during the renovation process.
Dust control during kitchen remodeling isn’t complicated, but it requires planning and consistent execution. The combination of physical containment, active air filtration, and daily cleaning prevents your home from becoming uninhabitable during construction. When you’re ready to start your kitchen remodel, proper dust mitigation should be part of your project plan from day one. N. Abeyta Remodels brings decades of experience managing remodels with minimal disruption to your family. Our licensed and insured team handles containment, protection, and cleanup as part of our full-service approach. Get a free estimate and learn how we minimize dust and keep your home comfortable throughout your renovation.
Frequently Asked Questions
Q: What is the most effective way to contain dust during a kitchen remodel?
A: The most effective approach combines plastic sheeting barriers, sealed doorways, and negative air pressure systems. Create a complete containment zone around the work area using 6-mil plastic sheeting taped to walls and ceilings. Seal all doorways with zip walls or plastic barriers, and run a HEPA-equipped air scrubber with negative air pressure to pull dust out of the space rather than letting it circulate through your home.
Q: Should I use an air purifier during a kitchen remodel?
A: Yes, but use a dedicated air scrubber designed for construction dust rather than a standard home air purifier. Construction-grade air scrubbers with HEPA filtration and negative air pressure are far more effective at capturing fine particulate matter like drywall dust and silica. Standard air purifiers lack the airflow capacity and filtration power needed for active renovation work.
Q: How do I get rid of dust in my house after remodeling?
A: Start with a post-remodel deep cleaning protocol: use a HEPA-filter vacuum to clean all surfaces, including ceiling fans and light fixtures where dust settles. Wipe down walls and surfaces with microfiber cloths slightly dampened with water to capture fine dust without spreading it. For drywall dust and silica particles, avoid dry sweeping, which re-suspends particles into the air. Seal off the work area during this cleanup phase, and run an air scrubber for 24-48 hours after the final cleaning to remove airborne particles.
Q: What are the best tools for cleaning up fine drywall dust?
A: HEPA-filter vacuums are essential for fine drywall dust cleanup. Pair them with microfiber cloths, which trap particles more effectively than standard cloths. Avoid traditional brooms and dry sweeping, as these re-suspend dust into the air. A wet-dry vacuum with HEPA filtration works well for larger debris and dust accumulation. For surface cleaning, slightly damp microfiber cloths and tack cloths (sticky cloths designed to capture fine dust) are your best options.
This article was written using GrandRanker