
Table of Contents
- Why Dust Control Matters During Home Renovation
- Step 1: Set Up Plastic Sheeting and Containment Barriers
- Step 2: Protect Your HVAC During Renovation
- Step 3: Install Air Filtration and Select the Best Air Scrubbers for Home Renovation
- Step 4: Use Dust Extraction Tools and Wet Sanding Techniques
- Step 5: Implement Your Post-Remodel Cleaning Checklist
- Common Mistakes to Avoid When Minimizing Remodel Dust
- Conclusion
- Frequently Asked Questions
Last Updated: August 31, 2026
Why Dust Control Matters During Home Renovation
Dust during home remodeling is a serious health hazard, not just an inconvenience. Silica dust from drywall and concrete poses respiratory risks, while drywall dust accumulates in HVAC systems, reducing efficiency and spreading contamination long after work ends (the CDC). Without proper containment and air filtration, a renovation can leave your home unhealthy for months.
At N. Abeyta Remodels, we’ve managed hundreds of kitchen and bathroom renovations. The difference between a pristine finish and one covered in fine particulates comes down to preparation. Homeowners who implement dust control strategies from day one report dramatically fewer post-project cleaning headaches and healthier indoor air quality.
This guide covers proven methods to minimize home remodel dust: plastic sheeting, HVAC protection, air scrubbers, and post-project deep cleaning. These aren’t optional extras, they’re the foundation of a professional renovation that protects your family and home.
Step 1: Set Up Plastic Sheeting and Containment Barriers
Physical containment is your first defense against dust spread. Plastic sheeting and temporary walls create a sealed barrier between your work zone and the rest of your home.
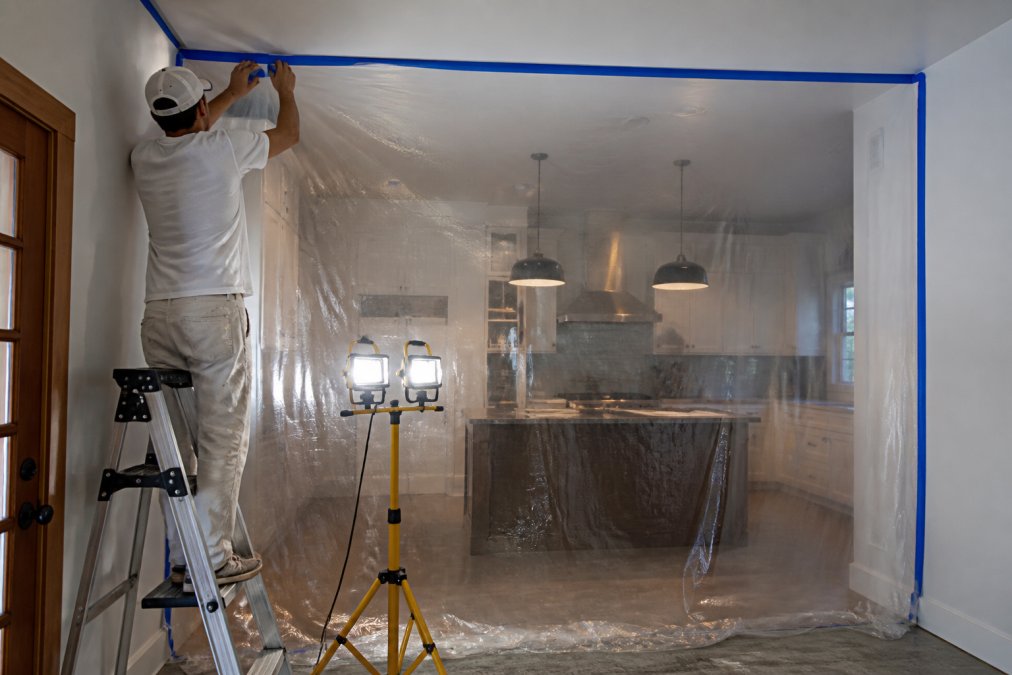
Identify all entry and exit points from your work area, doorways, windows, HVAC vents, electrical outlets. Use heavy-duty plastic sheeting (6-mil thickness minimum) and tape all seams with quality painter’s tape, overlapping by at least 6 inches. A single unsealed gap can allow dust to bypass your entire containment system.
Sealing Off Rooms with Zip Walls
Zip Walls and similar temporary barrier systems offer a faster alternative to traditional plastic sheeting. These portable frames create a complete seal without damaging walls or trim, particularly useful for kitchen and bathroom renovations.
Install Zip Walls floor-to-ceiling across doorways, overlapping plastic panels by at least 12 inches and sealing all overlaps with painter’s tape. Create an airlock entry point, a second plastic barrier with a small gap, so workers can enter and exit without breaking the main seal. This double-barrier system prevents dust from escaping when doors open.
Effective room sealing dramatically reduces what escapes into adjacent rooms, making a measurable difference in post-project cleanup time and indoor air quality.
Floor Protection and Surface Coverage
Use heavy plastic sheeting on all flooring in the work zone, extending at least 6 feet beyond your primary containment area. Tape the plastic down at edges and seams. For surfaces outside the immediate work zone, use canvas drop cloths or plastic sheeting. Protect HVAC registers and return vents with plastic and tape before work begins, unsealed vents allow dust directly into your ductwork.
Step 2: Protect Your HVAC During Renovation
Your HVAC system becomes a dust distribution network if unprotected. When your furnace or air conditioning runs during renovation, it pulls contaminated air through returns and circulates it throughout your home.
Turn off your HVAC system before work begins. If you need climate control, use portable units outside the work zone. If you must run your HVAC, upgrade to a MERV-13 filter minimum and seal all return air vents in the work zone with plastic sheeting and tape. Physical sealing prevents dust from entering the system in the first place.
Consider having your ductwork professionally cleaned after major renovation work. Dust settles inside ducts and continues to circulate long after visible construction ends.
Step 3: Install Air Filtration and Select the Best Air Scrubbers for Home Renovation
Once you’ve contained the work zone, air filtration becomes your second line of defense. An air scrubber with HEPA filtration removes airborne particles and prevents dust from escaping containment barriers.
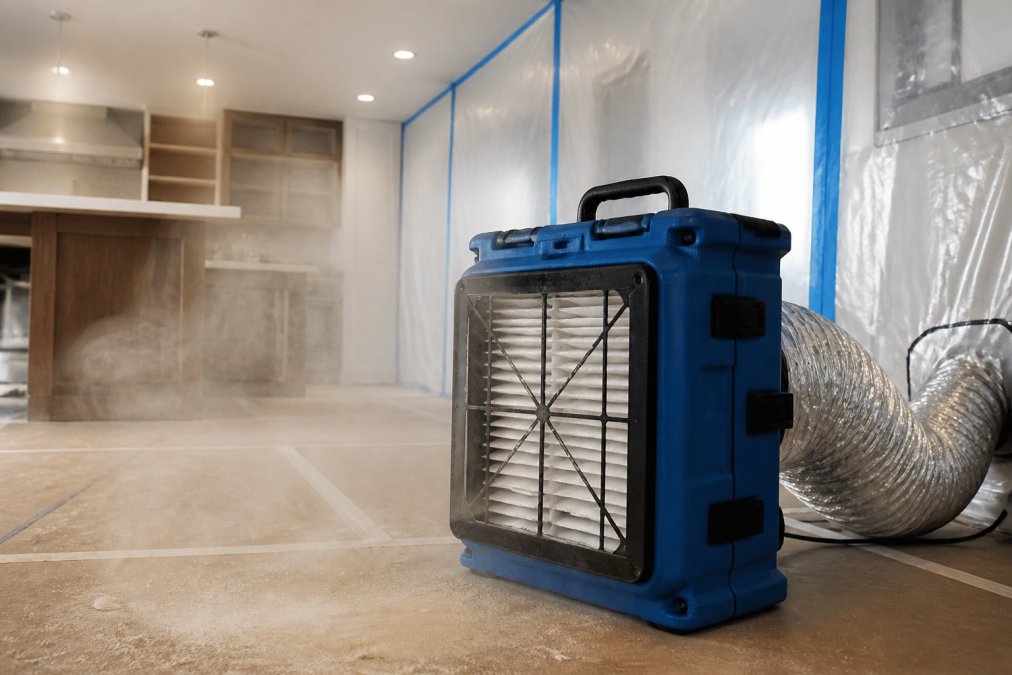
Position the unit inside your containment zone, away from the primary work area. Point the intake toward the dustiest part of the work zone.
HEPA Filtration and Negative Air Pressure
HEPA filters capture 99.97% of particles 0.3 microns and larger, including drywall dust and silica particles (the EPA). Verify your unit uses true HEPA filters, not “HEPA-type” filters, which are significantly less effective.
For most homeowner renovations, a quality portable air scrubber with HEPA filtration provides sufficient dust control. Run it continuously during work and for 4-6 hours after work ends each day. Replace pre-filters every 2-3 days if dust is heavy, and HEPA filters according to manufacturer specifications.
Step 4: Use Dust Extraction Tools and Wet Sanding Techniques
How you perform the work determines how much dust you generate. Using dust extraction tools and wet sanding techniques cuts dust production at the source.
Whenever you cut drywall, sand surfaces, or drill into concrete, use a dust shroud or dust extraction system. A shop vacuum with a HEPA filter connected to your power tools captures dust before it becomes airborne.
Wet sanding is a game-changer for drywall finishing. Instead of dry-sanding (which generates clouds of fine dust), wet-sand using a damp sponge. This eliminates airborne dust entirely. Use a microfiber cloth instead of a broom for cleanup during the project, microfiber traps dust rather than pushing it into the air.
Step 5: Implement Your Post-Remodel Cleaning Checklist
Dust doesn’t end when work stops. A comprehensive post-remodel cleaning protocol removes settled particles and prevents them from circulating for weeks afterward.
During-Construction Cleanup Protocol
Daily cleanup during renovation prevents dust accumulation. At the end of each work day, use a damp cloth or microfiber mop to wipe down surfaces in the work zone. Vacuum the work zone with a HEPA-filter vacuum. Wipe down your plastic containment barriers from the outside, dust settles on plastic sheeting and can escape when barriers are removed.
Final Deep Cleaning After Work Ends
Once construction ends, remove plastic sheeting carefully by rolling it up rather than shaking it. Vacuum the entire work zone and adjacent areas with a HEPA-filter vacuum twice, the first pass removes large particles, the second removes fine dust.
Wipe all surfaces with damp microfiber cloths, including walls, ceilings, light fixtures, door frames, and window sills. Clean cabinet interiors, shelving, and appliances. Construction dust settles inside cabinets and on appliance surfaces.
Replace furnace filters and ensure all vents are fully open. Run your air scrubber for an additional 8-12 hours after visible cleanup is complete. Airborne particles continue to settle for hours after work ends.
Common Mistakes to Avoid When Minimizing Remodel Dust
The most frequent error is underestimating how thoroughly dust travels. Dust travels through gaps under doors, through unsealed electrical outlets, and via HVAC systems. Seal everything or accept that dust will spread.
Another common mistake is relying on plastic sheeting alone without air filtration. You need both containment and active air filtration for effective dust control. Skipping HVAC protection is equally problematic, unsealed vents allow dust directly into ductwork, where it circulates throughout the home for months.
Using the wrong vacuum is another frequent problem. Standard household vacuums recirculate fine particles. Only HEPA-filter vacuums capture construction dust effectively. Finally, stopping cleanup too soon is a mistake. Dust continues to settle for days after work ends. Multiple passes over several days, combined with continued air filtration, are necessary to fully remove construction debris.
Conclusion
Minimizing home remodel dust requires a multi-layered approach: physical containment with plastic sheeting and zip walls, HVAC system protection, active air filtration with HEPA-equipped air scrubbers, dust-reduction work techniques, and comprehensive post-project cleaning. Each layer addresses a different dust pathway.
When planning a kitchen or bathroom renovation, dust control should factor into your timeline and budget from the start. N. Abeyta Remodels implements all these protocols on every project. Our licensed and insured team manages containment, air filtration, and post-project cleanup as part of our comprehensive renovation process.
Ready to plan a renovation that prioritizes dust control and indoor air quality? Contact N. Abeyta Remodels for a free estimate and discuss how we minimize disruption while delivering results that exceed expectations.
Frequently Asked Questions
How long does dust settle after a home renovation?
Airborne particles from drywall dust and silica dust can remain suspended for hours or even days without proper air filtration. Fine particulate matter settles gradually, but without HEPA filtration, dust will continue circulating through your home. Air scrubbers with HEPA filters can significantly speed up the settling process and improve indoor air quality during and after your remodel.
What’s the best way to protect my HVAC system during a renovation?
Seal off all return air vents and supply registers in the work zone with plastic sheeting and duct tape before demolition begins. This prevents drywall dust and construction debris from entering your HVAC system. Additionally, consider turning off your central HVAC during heavy dust-generating work and using isolated air scrubbers instead. If you must keep HVAC running, upgrade to higher-grade pre-filters and have your system professionally inspected and cleaned after the project ends to remove any accumulated particulate matter.
How do I know if an air scrubber is right for my renovation size?
Air scrubbers are rated by cubic feet per minute (CFM) and room size. For a single room or bathroom remodel, a portable unit with 400-600 CFM is typically sufficient. Larger kitchen renovations or multi-room projects benefit from units rated 1,000+ CFM. The unit should be placed in the work zone and run continuously during active construction and for several hours afterward. HEPA filtration is essential, it captures 99.97% of particles 0.3 microns and larger, including silica dust and drywall particles.
Should I cover furniture and belongings during a remodel?
Yes, absolutely. Cover all furniture, appliances, and personal items in the work zone and adjacent rooms with plastic sheeting or disposable coverings. Seal the plastic with tape to prevent dust from settling underneath. For items you cannot cover, move them to a completely separate, sealed-off area of your home. Even with containment barriers and air filtration in place, some fine dust will escape, covering your belongings protects them and reduces the post-remodel deep cleaning workload.
This article was written using GrandRanker